
TUTORIAL BROCHE DE BORBOLETA DE PENA
(também disponível em vídeo, clique aqui para visitar nosso canal no YouTube)
Materiais e intrumentos necessários:
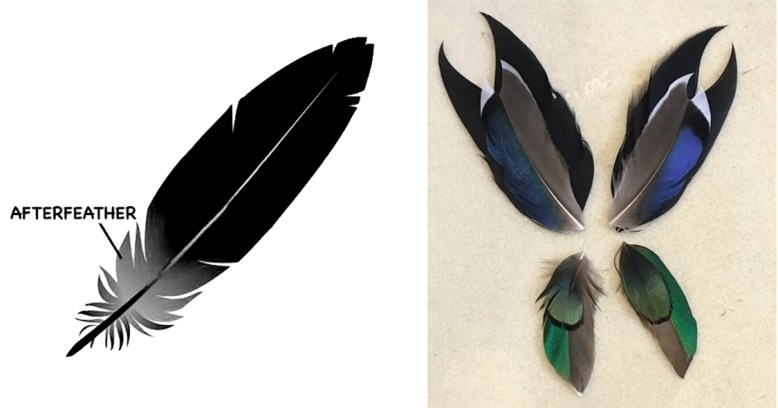
- Um par de penas de ganso pretas, com aproximadamente 15 cm de comprimento e com formato espelhado (se uma vira para a esquerda, a outra tem que virar para a direita, conforme ilustrado na foto abaixo).
- Um par de penas de pato-real (ou qualquer outra pena com ponta branca), com formatos espelhados e com aproximadamente 12 cm de comprimento.
- Um par de penas de marrequinha-americana (ou similar) com formatos espelhados e com aproximadamente 8 cm de comprimento.
- Um par de penas de faisão-lady (our parecido), com formato espelhado e com aproximadamente 5 cm de comprimento.
- 4cm de haste de chenile preta (também chamada de vara limpadora de cachimbo)
- Um par de miçangas vermelhas tamanho 11/0
- Uma base de broche com trava de aproximadamente 2cm
- Um corte de tecido de nylon preto de aproximadamente 5 x 5 cm (Dica: pode ser de uma sombrinha velha, ou do forro de uma bolsa velha). É importante selecionar um material resistente como o nylon porque este pedacinho de tecido será a base do broche.
- Cola transparente para artesanato
- Tesoura para artesanato (com ponta longa)
- Régua
- Agulha de costura
- Linha de costura preta (de preferencia de poliéster)
- Molde para cortar o nylon (clique aqui)
- Lápis branco
- Alicate pequeno com ponta longa
Importante: A queda de penas em aves é um processo natural e é possível adquiri-las em aviários (ás vezes até gratuitamente).

Instruções:
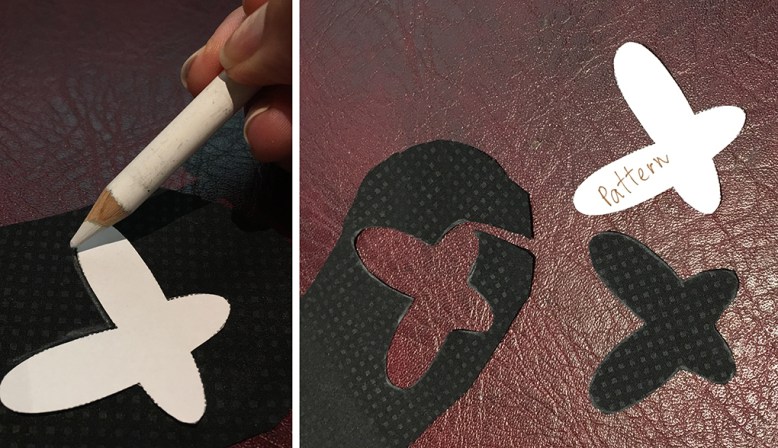
Asas: Baixe e imprima o ‘pattern’ ou molde da base (clique aqui para abrir o arquivo). A imagem impressa deve medir aproximadamente 4cm de altura.
Em uma superfície plana, coloque o molde em cima do tecido de nylon. Contorne o material com um lápis branco e, em seguida, corte-o. Este pequeno corte servirá como a base do broche, pois irá conectar as penas e o alfinete.
Reúna o par de penas pretas (item nº 1) e, usando uma tesoura com ponta fina, corte parte de sua raque superior, conforme mostrado abaixo e conforme nosso vídeo no YouTube sobre este tutorial. Não jogue nada fora ainda (ver imagem abaixo com dizeres ‘Save this!’). Mantenha a pequena seção de pena que você acabou de cortar, pois você precisará dela. Repita este passo com o par de penas de pato-real (item nº 2).
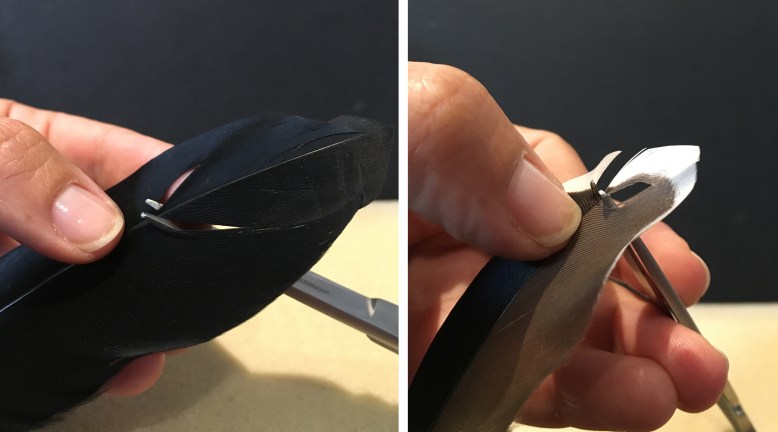
Certifique-se de cortar ambas as penas do mesmo par de forma uniforme. Use um lápis branco para marcar onde cortar, se necessário.

Agora, vamos aparar todas as penas até o ponto das “afterfeathers” (penas posteriores). Lembre-se! Os pares devem ter o mesmo comprimento. Nosso vídeo no YouTube mostra em detalhes como fazer isso.
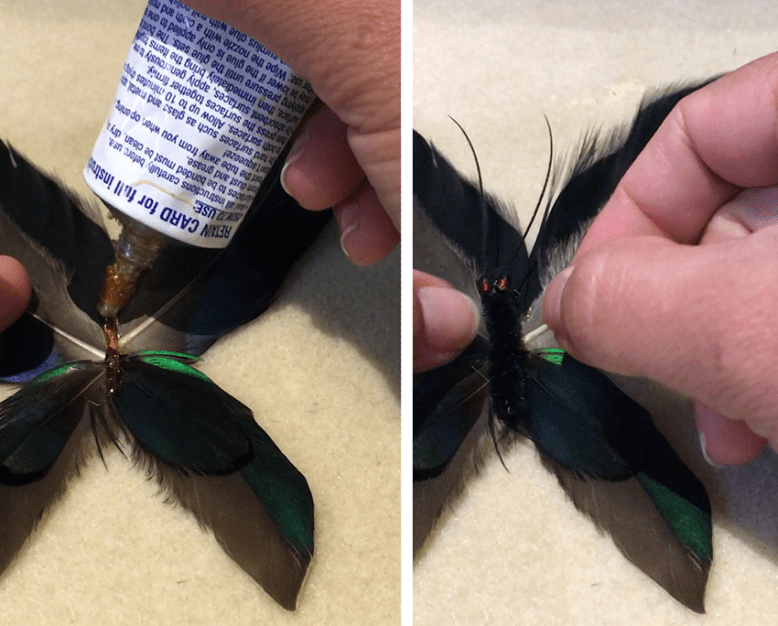
Em seguida, precisamos colar as penas menores nas maiores (assista o vídeo). Deixe-as secar por cerca de dez minutos. Posteriormente, cole-as na base de tecido de nylon, como mostrado abaixo:

Pressione a pena contra a base de nylon por um minuto. Em seguida, deixe-as secando por até dez minutos antes de continuar o seu projeto.
A próxima etapa é muito importante, então por favor não pule esta parte.
Corpo: Pegue a haste de chenille preto (item nº 5) com aproximadamente 4cm de comprimento e observe que as bordas do arame estão bastante pontiagudas e possivelmente perigosas; não queremos que ninguém se machuque! Além disso, após cortar a haste, ela tende a desenrolar o material do chenille preto, ele se desfia, portanto, para evitar isso, dobre ambas as extremidades com um alicate, formando um pequeno ‘loop’ ou laço, como ilustrado abaixo:

Olhos e antenas: Pegue a pena preta que sobrou (seção superior) e remova duas barbas dela (A); esse será o par de antenas da borboleta. Em seguida, mergulhe a ponta da barba na cola (B) e cole-a dentro da miçanga (C), repita este passo mais uma vez. Deixe o par de olhos/antenas secar e, posteriormente, cole-os no corpo da borboleta (D). Permita que sequem.

Unindo asas e corpo: Aplique cola na superfície traseira do corpo, como mostrado acima, na foto F. Em seguida, aplique mais cola no centro das asas e una imediatamente as partes, aplicando uma leve pressão. Depois, aguarde até que a cola seque (pelo menos uma hora).
Base do broche: Após a cola secar, insira a linha na agulha e costure o alfinete de metal na parte de trás da base de tecido de nylon. Ao passar a linha para o outro lado, certifique-se de envolvê-la em torno do corpo da borboleta, como mostrado no vídeo; isso irá garantir o seu trabalho. Como toque final, após amarrar a linha, aplique um pouco de cola no nó. Deixe secar.

Este é o resultado final!!!!
Dimensões finais do broche: aproximadamente 14 x 14 cm.

Assista a este e outros tutoriais em nosso canal do YouTube (www.YouTube.com/angablue).
Para mais aulas grátis nos siga pelo YouTube e/ou Instagram.
©2001-2024 Angablue.com/EF. All Rights Reserved
